AT&T Voice DNA® Administrator Support
Manage Schedules
Overview
A schedule is an AT&T Voice DNA® feature that provides time and date parameters for other features. A schedule consists of one or more events, each with a time, date, and recurrence option. An event covers a specific hour, a single day, or range of dates.
AT&T Voice DNA® Company Administrators create and manage Company schedules on the AT&T Voice DNA Administrator Dashboard. There are two types of schedule: Time (for work hours and days) and Holiday (for company holidays and other non-working events).
Location Administrators can view Company schedules but can't change or add to them.
Users can view but not edit Company schedules. They can include Company schedules when they configure their Call Notify, Priority Alert, and advanced Locate Me features on the AT&T Voice DNA User Dashboard. A schedule determines when the feature is applied to incoming calls. Users can create and manage Personal schedules. Administrators can't view or edit users' Personal schedules.
View Schedules and Events
Holiday and Time schedules appear together on the Schedules page of the AT&T Voice DNA® Administrator Dashboard.
To view schedules and events
- Log in to Premier and then access the AT&T Voice DNA Administrator Dashboard. (For help with this step, see Log In.)
- Click SETTINGS, and then click Schedules immediately below. The Schedules list appears, indicating each schedule's type (Holiday or Time).
- (Optional) To find a specific schedule, in the Search field, enter the first few letters of the schedule name, and then click Go.
- (Optional) To view only one schedule type, from the Show List for menu, select Holiday or Time.
- To view details, click a schedule name. The Schedule Details page appears.
- Click an event name to view event details.
Create and Edit Company Schedules
Company Administrators can create, edit, and delete Company schedules and events on the AT&T Voice DNA®Administrator Dashboard. You can't delete a Company schedule that is currently activated in any user's selective criteria rule, but you can edit it.
To create a Company schedule
- Log in to Premier and then access the AT&T Voice DNA Administrator Dashboard. (For help with this step see Log In.)
- Click SETTINGS, and then click Schedules immediately below. The Schedules list appears, showing both Time and Holiday schedule types.
- At the top-right of the page, click Create Schedule. The Create Schedule page appears.
- In the Schedule Name box, enter a name for the schedule. Then specify whether it's a Time or Holiday type. The name must be unique within the type.
- Click Create. The new schedule's Details page appears, with a message that your schedule was created successfully.
- Now add an event. You can add events now or later.
To edit a Company schedule
- Log in to Premier and then access the AT&T Voice DNA Administrator Dashboard. (For help with this step see Log In.)
- Click SETTINGS, and then click Schedules immediately below. The Schedules list appears, showing both Time and Holiday schedule types.
- Locate the schedule you want to edit.
- Under Actions, click the Edit icon
 . Or, click the schedule's name to display its details, and then click Edit.
- Rename the schedule or edit the Events list, and then click Save.
Note: You can't edit the schedule type. If you need a different schedule type, you must create a new schedule.
To delete a Company schedule
- On the Schedules page, locate the schedule you want to edit.
- Under Actions, click the Delete icon
 .
.
Create and Edit Events
Every schedule has one or more events, which define the days and times when the schedule is actively in effect. Each event has an initial start and end time, and each event can occur one time or repeat. Schedules can contain up to 25 events.
Whenever an event's specified time period (and recurrence pattern, if selected) matches the current calendar date and time, the schedule containing this event takes effect and affects all the features and settings to which the schedule has been applied.
Initial Event Details

These settings specify the duration of the first complete instance of the event:
- Initial start and end dates specify the dates of one complete occurrence of the event.
- Start and end times specify the hours in which the event occurs.
- If you select All day event, the initial start and end times option become unavailable.
Event Recurrence Details

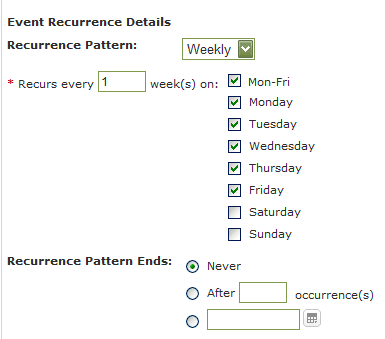
Event Recurrence specifies how frequently the Initial Event Details are repeated: daily, weekly, monthly, or yearly. You can also specify recurrence intervals, such as every 5 days or every 2 weeks. You can set a recurrence pattern to stop on a specific date, after a number of occurrences, or not at all.
Event Examples
Here are some examples of how to set typical events:
A one-time holiday (for example, the first day of school)
- Same initial start and end date.
- All day event checked.
- Recurrence set to Never.
An annual holiday (for example, New Year's Day)
- Both the initial start and end Date set to 1/1/2013.
- All day event checked.
- Recurrence set to Yearly.
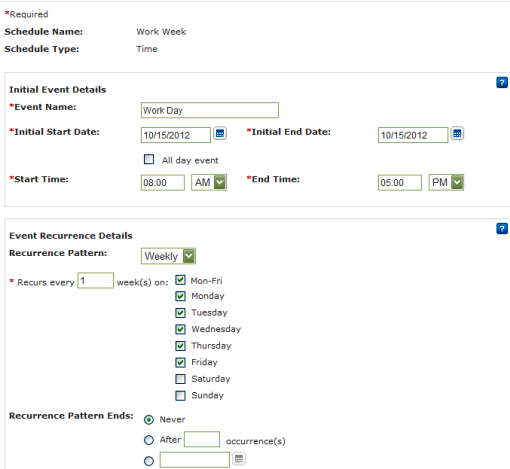
The company's work week
- Initial start date is a specific Monday.
- Initial end date is set to the same Monday.
- Start time is 8:00 a.m., end time is 5:00 p.m.
- Recurrence pattern is set to Weekly.
- Recurs every 1 week. Check Mon-Fri and each individual day Monday, Tuesday, Wednesday, Thursday, and Friday.
- Recurrence pattern ends never.

Note: The system doesn't prevent overlapping or conflicting events from being saved within the same schedule or across multiple schedules. Always verify that the action you want is applied.
To add an event to a Company schedule
- Log in to Premier and then access the AT&T Voice DNA® Administrator Dashboard. (For help with this step see Log In.)
- Click SETTINGS, and then click Schedules immediately below. The Schedules list appears, showing both Time and Holiday schedule types.
- Click a schedule name.
- In the Events section, click Add Event.
- In the Initial Event Details section, enter the following information:
- Event Name—Enter a descriptive name for the event. This event name must be unique within this schedule. Some special characters (for example, @, ~ , +) are not accepted.
- Initial Start Date and Initial End Date—Enter the start and end dates for the first occurrence of this the event. To pick dates from the calendar, click the calendar icons
 .
.
The end date must occur after the start date. If this is a repeating event, use the Event Recurrence Details settings, described below. - All day event—If the event lasts all day, you can check this option instead of entering start and end times.
- Start Time and End Time—Enter the time (in hours and minutes) when the event starts and when it ends. Make sure to select the appropriate a.m. or p.m. option.
- Start and end times can range from 12:00 a.m. (first minute of the day) to 11:59 p.m. (last minute of the day). 12:00 p.m. is noon, or mid-day.
- The end time must be later than start time unless the event spans more than one day (the end date occurs later than the start date).
- In the Event Recurrence Details section:
- If the event repeats every day, week, month, or year, select that time frame from the Recurrence Pattern list. The section's options change according to the pattern you select.
- Enter how many times the event pattern occurs, and in what time frame.
- For schedules that repeat for every cycle of the selected pattern, enter 1. For example, a daily schedule Recurs every 1 day(s).
- The recurrence interval can't be shorter than the span of days between the initial start date and the initial end date. (For example, you can't have a Daily recurrence pattern for an event that starts and ends on different days).
- Indicate after what date or after how many occurrences the pattern should end.
- Click Save. The Schedule Details page shows the new event in the Events table.
To edit an event
- On the Schedule Details page, locate the event in the Events section.
- Under Actions, click the Edit icon
 . Or, click the event's name to display its details, and then click Edit.
- Make needed changes to the event, and then click Save.
To delete an event
- On the Schedule Details page, locate the event in the Events section.
- Under Actions, click the delete icon
 .
.
