AT&T Voice DNA® Administrator Support
Run a Registration Report
The Registration Report provides comprehensive details about the devices currently in use at one or more locations. It includes information about every device and line appearance that's currently able to make and receive calls using the AT&T Voice DNA® service.
The Registration Report includes the following:
- Provisioned location ID and name
- Device type: IP phone, softphone, or adapter
- Make/Model of the phone or adapter
- Firmware version
- Last check-in date
- MAC Address/Identifier of the phone or adapter
- Phone or adapter port owner name
- Extension number for the device
- URI (Uniform Resource Identifier) associated with the device
- Expiration date for registration
- Line Key or Adapter Port index for the given extension
- Call appearance owner name
- Registration ID
- Call presence (whether the line appearance is shared)
- Whether the line appearance is a primary line appearance
Note: You can quickly find registration information for a single extension from the AT&T Voice DNA Administrator Dashboard. Click RESOURCES, and then click Equipment immediately below. On the Equipment page that appears, click Registrations, enter the user’s phone number or extension (or click Find user to look up the user), and then click View Registrations.
To run a Registration Report
- Open the AT&T Voice DNA Administrator Dashboard. (For help with logging in, see Log In.)
- To open the report, do one of the following:
- At the top of the page, click REPORTS. Under Administration, select Registration Report.
- At the top of the page, click RESOURCES, and then click Equipment. Under Equipment, click Reports, and then select Registration Report.
If your company is very large, you may see a My Recent Reports tab and an All Reports tab on the Reports page. To run a new report, click All Reports, and then click the report name. To view your pending and saved reports, click My Recent Reports. (For more information, see Manage Reports.)
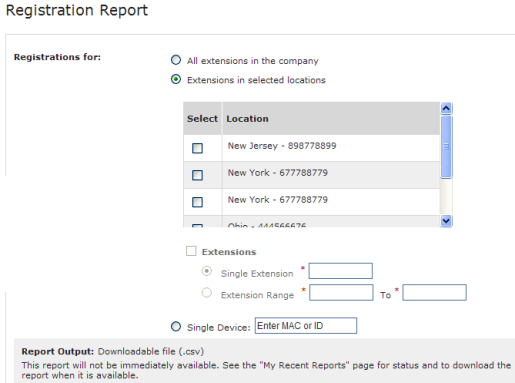
- Specify the location and extensions for the report:
- To include all extensions at all locations, select All extensions in the company.
- To include all extensions for specific locations, select Extensions at selected locations, and then select the locations you want to include.
- To include only specific phone extensions, select Extensions at selected locations, and then select the locations you want. Select Extensions, select Single Extension or Extension Range, and then enter the appropriate extensions.

- To limit the report to a single device, select Single Device, and then enter the device's MAC ID or the softphone’s identifier.
- Under Report Output, select Display on Screen or Downloadable File (.csv). (If you select Display on Screen, you’ll get another chance to download the file later.)
Note: If your data set is too large, Display on Screen may not be available. - Click Generate Report.
- If you selected Display on Screen, the results appear on screen. To save the file, click Save results to a text file.
- If you selected Downloadable File (.csv), click Download Report (CSV) when the report confirmation window opens. In the File Download window that appears, click Open to view the results in your spreadsheet application, or click Save to save the results as a text file on your computer.
Note: For larger companies or data sets, the report may not run immediately. Instead, a confirmation message appears, telling you to check the My Recent Reports tab for the report. (For more information on using the My Recent Reports tab and managing reports for large companies, see Manage Reports.)
