AT&T Voice DNA® Administrator Support
Manage Receptionist
Overview
Front-office receptionists or phone attendants in your organization can use the AT&T Voice DNA® Receptionist application to monitor and manage users' calls.
As an Administrator, you control a user's ability to use Receptionist by setting permission on the AT&T Voice DNA Administrator Dashboard.
A user with permission to use the Receptionist application can start Receptionist from the AT&T Voice DNA User Dashboard. After launching Receptionist and signing in, the user can use the Receptionist workspace to:
- Monitor the line status of selected users.
- Answer and hold calls.
- Drag and drop call transfers.
- Place calls directly, or from contacts, call history, and speed dial codes.
- Search the company Directory easily.
- Create and manage conference calls for three or more contacts.
- And much more. For details, see the Receptionist User Guide.
Activate the Receptionist Application
You can give a user with a Premium feature package access to the Receptionist application. The user can then start Receptionist from the AT&T Voice DNA User Dashboard.
To activate the Receptionist feature for a user
- Open the AT&T Voice DNA Administrator Dashboard, and then locate the user's information. For help with this step, see Log In and Use Search. The User Details page appears with the Profiles tab selected.
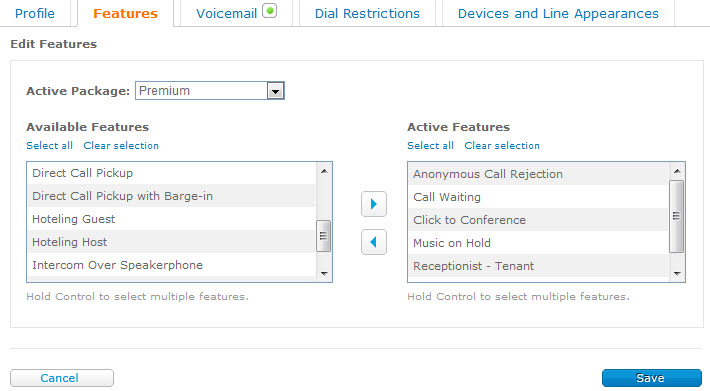
- Click the Features tab, and then click Edit.

- From the Active Package list, verify that Premium is selected. If not, select Premium.
- From the Available Features box, select Receptionist - Tenant, and then click the right arrow to move it into the Active Features box.
- If the user is to host conference calls in the Receptionist application, or manage or pick up monitored users' calls, activate the appropriate feature as in step 4, above.
- Click Save.
- Add users for this new receptionist to monitor. See Manage Receptionist-Monitored Users, below.
Manage Receptionist-Monitored Users
A receptionist (person with permission to access the Receptionist application) can monitor the call status of up to 200 selected company users. As an Administrator, you manage the receptionist's list of monitored users.
To manage a receptionist's list of monitored users
- Open the AT&T Voice DNA Administrator Dashboard, and then locate the Receptionist user's information. For help with this step, see Log In and Use Search. The User Details page appears with the Profiles tab selected.
- Click Manage Receptionist's Monitored Users. The list of monitored users appears.
- To add a monitored user, click Add Monitored Users. The Add Monitored Users window opens, showing all users in the receptionist's default location who can be assigned.
You can search for a specific user in any location. For help with this step, see Use Search.
- Check the boxes next to the names of users you want to add, and then click Save. The updated list of monitored users appears.
- To remove a monitored user from the list, check the box next to the user's name, and then click Delete.
Note: To alert the receptionist that the monitored users list has been updated, a confirmation message appears on the Receptionist application workspace, in the Contacts pane on the Monitored Users tab.
